3.1.1: A Walk Through A View Part 2
Last time, we created two types that will provide us the ability to simply some code that would other wise appear very dense and complex. Generally, I have tried to write these tutorials in such a way that each step is broken down to be readily understandable and approachable regardless of ones programming background. Moving objects or moving one's point of view through three dimensional space, involves very complex math. Part 1 of this tutorial was an attempt to make the math concepts understandable for use here in Part 2 and onward.
Utilizing Vector3 and Matrix4
In SwiftOpenGLView.swift of the OnTheMove project, add a few new variables to the SwiftOpenGLView class after the declaration of the others: cameraPosition, cameraOrientation, the view matrix and the projection matrix.
The view matrix holds data regarding positioning of the camera in three dimensional space while the projection matrix holds data regarding visibility of vertices in relation to a point in space. In this project, the view matrix will move and orient the viewing direction at a given point in space. We'll use our translate and rotate methods for this purpose. The projection matrix adjusts how vertices are viewed at that point in space such that it is either a perspective or orthogonal view. Perspective utilizes the concept of vanishing points (i.e. objects get smaller as they are displaced further from the point of view). Orthogonal is a non realistic viewing angle that makes all objects appear equally far from the point of view--the kind of view one see on a blueprint.
Let's utilize these matrices in the vertex shader. Add two new uniforms after the others.
The uniform keyword identifies these variables as constant for all vertices during the draw call while mat4 is the keyword for a 4 x 4 matrix. Within the body of the vertex shader, multiple the incoming vertex by these matrices and set gl_Position to this value.
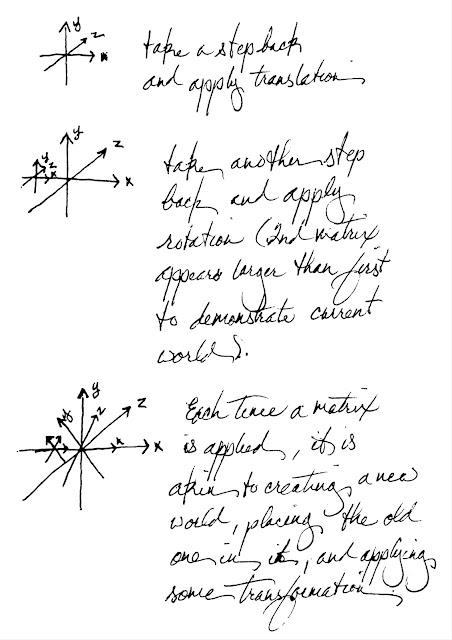
Apply a matrix to vertex data is like taking the current world, stepping outside of it and manipulating it about a fresh new origin. This is another way of staying that matrices don't move the camera in the world, they move world around the camera.
Hopefully, you can see from the figure above how each application of a matrix places the current world into a new world at some location and orientation. The result, is something we haven't had to worry about so far, objects behind the camera are not going to show up in the view! To avoid not being able to see our Triangle when we first start, we'll move the world back from the camera (push it into the view) so that it remains visible. It's not worth pushing the triangle back in it's own local space (making the z values less than zero) because remember, the local space of an object is it's own little world that is placed into a larger world. At the end of prepareOpenGL( ), after the glUniform* calls and before the drawView( ) call, set the view matrix's z value (view.m23) to -5.0. This is equivalent to taking our 2x2x2 unit world and moving it into the view by 2.5 world lengths. Notice that I am purposely not stating a certain distance in feet or meters because we have defined no such thing. One unit has no predefined correlation to physical measurements. However, as we develop our app further, we'll think of 1 unit in 3D space as being 1 meter in length in the real world for the sake of simplicity (e.g. we are pushing the triangle into the view by 5 meters). Then set the parameters for the projection matrix.
The field of view defines how much of the world in front of the viewer is seen. Appropriate values are 0.0 < x < 180.0. Essentially, 0.0 is equivalent to a blind viewer, and 180.0 is equivalent to objects present in the vertical plane of the viewer (I can't see something directly at my sides, directly above me, or directly below me if I am looking straight ahead... can you... if you think you can, you're lying to yourself). Many OpenGL tutorials define the fieldOfView parameter as the "zoom" of the camera. While this parameter does provide some aspect of "zoom", that's not what it really does. In the real world, it is a combination of fieldOfView in the setting of a given FOCAL LENGTH that defines the level of "zoom". OpenGL projection matrices don't take into account this focal length parameter so fieldOfView cannot be used for "zooming". To achieve what one would consider to be "zoom" in 3D space, we need to use scaling instead. We'll cover scale at a later time. Aspect is a ratio of the SwiftOpenGLView's width to it's height. This provides mathematic information regarding the ceiling and floor of the visible world while nearZ and farZ define how close and how something may be to the camera to be viewed. Again, a value of 0.0 would be like looking at something that is IN your retina. Impossible, and quite painful. The farZ value helps OpenGL optimize calculations. If you create a game world that has millions of objects and you have a viewer in this world a some point. It would be inappropriate to draw those objects that are a distance from the view so great that they are essentially unseen. Thus, setting a clipping distance (a distance which defines visibility) greatly improves computation speed.
In reality, time is always moving forward. Traveling requires covering some distance in a given length of time (i.e. a speed at which to travel). The updateViewMatrix(_:) function takes in a time interval so that the distance traveled between frames may be calculated and applied as the current value of displacement from the previous location.
We'll use the keyboard to move the position of the camera and the mouse for the orientation of the camera. Input from this devices may be received from the view controller and the view controller may pass this information to our view. Working with mouse input is rather easy, but working with the keyboard is different. We want to press the "W" key and move forward until the "W" key is released. The keyboard is scanned so many times a second for input. If we wait for these scans to be able to tell if the key is still being held results into two things: 1) there is a delay between the first and second scan (i.e. there is a pause every time we press and hold a key), and 2) time between scans may be slower than the refresh rate of our view (i.e. jittery movement). To avoid these side effects, we use an on-off system which means displacement in a given direction continues to be applied as long as a key remains pressed. Now instead of passing around key codes which don't provide meaningful information the programmer, we'll implement a enum that assigns the key codes for the "W", "A", "S", and "D" keys to meaningful names.
Then in a dictionary, we use the key code names as keys to boolean values. There initial values will be negative because when the view is loading, we have not received user input, and thus as far as the view is concerned no key has been depressed.
Now within the updateViewMatrix(_:) function we use this data to apply displacement.
Now within drawView( ), call updateViewMatrix(_:) and pass in the current media time (the value we've been using for our previous animations. As an optimization, we're going to capture the current time once and then pass it to each function that needs a time value. We also need to pass in the most current matrices with glUniform* calls prior to calling glDrawArrays( ).
Now we'll discuss the view controller. Apple's app design paradigm adopts Model-View-Controller methodology. These makes apps theoretically more modular and easily upgradable. We haven't touched on objects and types that belong in the Model section of an app, but we have worked with the View and Controller components. The view controller is where we retrieve and send data, it's a hub that drives an app forward. User data is collected in the controller and then passed to either a model or a view. Here we are going to pass position related data to the SwiftOpenGLView instance. We'll start with the keyboard's keyDown(_:) method.
Now we'll implement the keyUp(_:) event to stop moving the camera in a given direction.
By default, a view accepts mouse input, but not keyboard input. In order to get a view to recognize keyboard input, we need to set the view's responder status. Enable the acceptsFirstResponder property.
Run the app, and you should now be able to move around in your 3D world with the WASD keys.

Now for Orientation. Navigate back to SwiftOpenGLView.swift and add a new function after updateViewMatrix(_:) called rotateCamera(_:_:).
Back in updateViewMatrix(_:), update the last line that sets the view matrix to the following:
Now back in ViewController.swift, override the mouseDragged(_:) method after the keyDown(_:) and keyUp(_:) methods.➥
With that, run the application and move freely through your 3D world.

We now have a working 3D view that supports objects, colors, textures, and movement. Before we start adding more functionality, it's time to make our code a little more Swift. That's right it's time to refactor. Doing everything out such that it is one long list of steps more or less is very useful when one just starting to learn how to work in OpenGL, but the bigger the project gets, the confusing may get as well. Before you move on, make sure you understand how each piece fits into the app itself.
Please leave your comments and questions in the comments below. Help me make these tutorials better! If there is something you don't understand, feel is unclear, or can't get to work, just let me know. I'll do my best to help. Thank you for follow along so far!
The project target for this tutorial is on GitHub: OnTheMove.
When you're ready, click here to start refactoring SwiftOpenGLView.swift.
var cameraPosition = Vector3(v0: 0.0, v1: 0.0, v2: -5.0)
var cameraOrientation = Vector3(v0: 0.0, v1: 0.0, v2: 0.0)
private var view = Matrix4()
private var projection = Matrix4()
The view matrix holds data regarding positioning of the camera in three dimensional space while the projection matrix holds data regarding visibility of vertices in relation to a point in space. In this project, the view matrix will move and orient the viewing direction at a given point in space. We'll use our translate and rotate methods for this purpose. The projection matrix adjusts how vertices are viewed at that point in space such that it is either a perspective or orthogonal view. Perspective utilizes the concept of vanishing points (i.e. objects get smaller as they are displaced further from the point of view). Orthogonal is a non realistic viewing angle that makes all objects appear equally far from the point of view--the kind of view one see on a blueprint.
Let's utilize these matrices in the vertex shader. Add two new uniforms after the others.
"uniform mat4 view; \n" +
"uniform mat4 projection; \n" +
The uniform keyword identifies these variables as constant for all vertices during the draw call while mat4 is the keyword for a 4 x 4 matrix. Within the body of the vertex shader, multiple the incoming vertex by these matrices and set gl_Position to this value.
"gl_Position = projection * view * vec4(position, 0.0, 1.0); \n" +
Apply a matrix to vertex data is like taking the current world, stepping outside of it and manipulating it about a fresh new origin. This is another way of staying that matrices don't move the camera in the world, they move world around the camera.

Hopefully, you can see from the figure above how each application of a matrix places the current world into a new world at some location and orientation. The result, is something we haven't had to worry about so far, objects behind the camera are not going to show up in the view! To avoid not being able to see our Triangle when we first start, we'll move the world back from the camera (push it into the view) so that it remains visible. It's not worth pushing the triangle back in it's own local space (making the z values less than zero) because remember, the local space of an object is it's own little world that is placed into a larger world. At the end of prepareOpenGL( ), after the glUniform* calls and before the drawView( ) call, set the view matrix's z value (view.m23) to -5.0. This is equivalent to taking our 2x2x2 unit world and moving it into the view by 2.5 world lengths. Notice that I am purposely not stating a certain distance in feet or meters because we have defined no such thing. One unit has no predefined correlation to physical measurements. However, as we develop our app further, we'll think of 1 unit in 3D space as being 1 meter in length in the real world for the sake of simplicity (e.g. we are pushing the triangle into the view by 5 meters). Then set the parameters for the projection matrix.
projection = Matrix4(fieldOfView: 35, aspect: Float(bounds.size.width) /
➥Float(bounds.size.height), nearZ: 0.001, farZ: 1000)
The field of view defines how much of the world in front of the viewer is seen. Appropriate values are 0.0 < x < 180.0. Essentially, 0.0 is equivalent to a blind viewer, and 180.0 is equivalent to objects present in the vertical plane of the viewer (I can't see something directly at my sides, directly above me, or directly below me if I am looking straight ahead... can you... if you think you can, you're lying to yourself). Many OpenGL tutorials define the fieldOfView parameter as the "zoom" of the camera. While this parameter does provide some aspect of "zoom", that's not what it really does. In the real world, it is a combination of fieldOfView in the setting of a given FOCAL LENGTH that defines the level of "zoom". OpenGL projection matrices don't take into account this focal length parameter so fieldOfView cannot be used for "zooming". To achieve what one would consider to be "zoom" in 3D space, we need to use scaling instead. We'll cover scale at a later time. Aspect is a ratio of the SwiftOpenGLView's width to it's height. This provides mathematic information regarding the ceiling and floor of the visible world while nearZ and farZ define how close and how something may be to the camera to be viewed. Again, a value of 0.0 would be like looking at something that is IN your retina. Impossible, and quite painful. The farZ value helps OpenGL optimize calculations. If you create a game world that has millions of objects and you have a viewer in this world a some point. It would be inappropriate to draw those objects that are a distance from the view so great that they are essentially unseen. Thus, setting a clipping distance (a distance which defines visibility) greatly improves computation speed.
Updating the View Matrix
Every time we move the camera, we need to update the view matrix. We'll create a function that applies transformation according user input received through the view controller. We'll get to what that is shortly. After prepareOpenGL( ), define a new function:
func updateViewMatrix(atTime time: CFTimeInterval) { }
We'll use the keyboard to move the position of the camera and the mouse for the orientation of the camera. Input from this devices may be received from the view controller and the view controller may pass this information to our view. Working with mouse input is rather easy, but working with the keyboard is different. We want to press the "W" key and move forward until the "W" key is released. The keyboard is scanned so many times a second for input. If we wait for these scans to be able to tell if the key is still being held results into two things: 1) there is a delay between the first and second scan (i.e. there is a pause every time we press and hold a key), and 2) time between scans may be slower than the refresh rate of our view (i.e. jittery movement). To avoid these side effects, we use an on-off system which means displacement in a given direction continues to be applied as long as a key remains pressed. Now instead of passing around key codes which don't provide meaningful information the programmer, we'll implement a enum that assigns the key codes for the "W", "A", "S", and "D" keys to meaningful names.
enum KeyCodeName: UInt16 {
case forward = 13 // W
case backward = 1 // S
case left = 0 // A
case right = 2 // D
}
var directionKeys: [KeyCodeName: Bool] = [ .forward : false, .backward : false, .left : false,
➥.right : false ]
Now within the updateViewMatrix(_:) function we use this data to apply displacement.
func updateViewMatrix(atTime time: CFTimeInterval) {
// The speed at which we desire to travel in units (or meters) per second
// Here we state we want to travel 10 m/s
let amplitude = 10 * Float((time - previousTime))
// Find the new position by first pointing ourselves in the current direction
// Instead of using matrices, we'll use trigonometry to calculate the direction
// we are looking. This calculated vector is then normalized before applying
// the amplitude value. This "displacement" vector is then added to the
// camera's position vectors according to the key's currently being pressed
let directionX = (sin(cameraOrientation.v1) * cos(cameraOrientation.v2))
// Moving off of the y = 0 plane is as easy as adding the y values (instead of
// multiplying) them together, otherwise looking up while moving forward does
// not affect the elevation of the viewer. Give it a try.
// In order to get the camera to pitch up when you look up, negate the y value
let directionY = -(sin(cameraOrientation.v0) + sin(cameraOrientation.v2))
let directionZ = (cos(cameraOrientation.v0) * cos(cameraOrientation.v1))
// Create a vector, normalize it, and apply the amplitude value
let displacement = Vector3(v0: directionX, v1: directionY, v2: directionZ).normalize()
➥* amplitude
// For strafing, calculate the vector perpendicular to the current forward and up
// vectors by rotating the normalized X vector (1.0, 0.0, 0.0) according to current
// orientation, then re-normalize before applying the amplitude value
let rightVector = Matrix4().rotateAlongXAxis(cameraOrientation.v0)
➥.rotateAlongYAxis(cameraOrientation.v1).inverse() *
➥Vector3(v0: 1.0, v1: 0.0, v2: 0.0)
let strafe = rightVector.normalize() * amplitude
// Cycle through the direction keys and apply displacement accordingly
// The switch statement allows us to test for conditions in which keys are pressed
for direction in directionKeys {
switch direction {
case (KeyCodeName.forward, true):
cameraPosition = Vector3(v0: cameraPosition.v0 + displacement.v0, v1:
➥cameraPosition.v1 + displacement.v1, v2: cameraPosition.v2 + displacement.v2)
case (KeyCodeName.backward, true):
// Moving backwards is done by adding a negative displacement vector
cameraPosition = Vector3(v0: cameraPosition.v0 + (-displacement.v0), v1:
➥cameraPosition.v1 + (-displacement.v1), v2: cameraPosition.v2 +
➥(-displacement.v2))
case (KeyCodeName.left, true):
cameraPosition = Vector3(v0: cameraPosition.v0 + strafe.v0, v1: cameraPosition.v1
➥+ strafe.v1, v2: cameraPosition.v2 + strafe.v2)
case (KeyCodeName.right, true):
// Strafing to the right is done with a negative strafe vector
cameraPosition = Vector3(v0: cameraPosition.v0 + -strafe.v0, v1: cameraPosition.v1
➥+ -strafe.v1, v2: cameraPosition.v2 + -strafe.v2)
case (_, false):
// We will fill this in later.
}
}
// Update the view Matrix with our new position--use the translate function
view = Matrix4().translate(x: cameraPosition.v0, y: cameraPosition.v1, z: cameraPosition.v2)
}
private func drawView() {
guard let context = self.openGLContext else {
Swift.print("oops")
return
}
context.makeCurrentContext()
CGLLockContext(context.CGLContextObj)
let time = CACurrentMediaTime()
let value = Float(sin(time))
updateViewMatrix(atTime: time)
// Update previousTime regardless so delta time is appropriately calculated between frames.
previousTime = time
glClearColor(GLfloat(value), GLfloat(value), GLfloat(value), 1.0)
glClear(GLbitfield(GL_COLOR_BUFFER_BIT))
glUseProgram(programID)
glBindVertexArray(vaoID)
glUniform3fv(glGetUniformLocation(programID, "light.position"), 1, [value, 1.0, 0.5])
glUniformMatrix4fv(glGetUniformLocation(programID, "view"), 1, GLboolean(GL_FALSE),
➥view.asArray())
glUniformMatrix4fv(glGetUniformLocation(programID, "projection"), 1, GLboolean(GL_FALSE),
➥projection.asArray())
glDrawArrays(GLenum(GL_TRIANGLES), 0, 3)
glBindVertexArray(0)
CGLFlushDrawable(context.CGLContextObj)
CGLUnlockContext(context.CGLContextObj)
}
Now we'll discuss the view controller. Apple's app design paradigm adopts Model-View-Controller methodology. These makes apps theoretically more modular and easily upgradable. We haven't touched on objects and types that belong in the Model section of an app, but we have worked with the View and Controller components. The view controller is where we retrieve and send data, it's a hub that drives an app forward. User data is collected in the controller and then passed to either a model or a view. Here we are going to pass position related data to the SwiftOpenGLView instance. We'll start with the keyboard's keyDown(_:) method.
override func keyDown(theEvent: NSEvent) {
// Grab the SwiftOpenGLView instance. A viewController instance contains a main
// (content) view. This is the view that we add subviews to as you may recall.
// We know that we have only added one view to this content view, so we can
// access it quickly as the first element of the content view's subview's array.
// We know that we are going to be using properties only defined in an instance
// of SwiftOpenGLView so we verify the view we retrieve is of this type with as?
if let view = self.view.subviews[0] as? SwiftOpenGLView {
// Grab the key code value
if let keyName = SwiftOpenGLView.KeyCodeName(rawValue: theEvent.keyCode) {
// This step isn't strictly necessary, but it avoids constantly setting
// the bool to true while the key remains pressed
if view.directionKeys[keyName] != true {
view.directionKeys[keyName] = true
}
}
// If the view doesn't exist, maybe we are trying to do something else
// Call the super's method to see if it has something it needs to do
} else { super.keyDown(theEvent) }
}
Now we'll implement the keyUp(_:) event to stop moving the camera in a given direction.
override func keyUp(theEvent: NSEvent) {
if let view = self.view.subviews[0] as? SwiftOpenGLView {
if let keyName = SwiftOpenGLView.KeyCodeName(rawValue: theEvent.keyCode) {
// This time turn movement in a direction off
view.directionKeys[keyName] = false
}
} else { super.keyUp(theEvent) }
}
By default, a view accepts mouse input, but not keyboard input. In order to get a view to recognize keyboard input, we need to set the view's responder status. Enable the acceptsFirstResponder property.
override var acceptsFirstResponder: Bool { return true }
Run the app, and you should now be able to move around in your 3D world with the WASD keys.

Now for Orientation. Navigate back to SwiftOpenGLView.swift and add a new function after updateViewMatrix(_:) called rotateCamera(_:_:).
func rotateCamera(pitch xRotation: Float, yaw yRotation: Float) {
// Retrieve the number of degrees to add to the current camera rotation on the x axis
// Consider xRotation to be in degrees--convert to radians
let xRadians = cameraOrientation.v0 + -xRotation * Float(M_PI) / 180
// Constrain radians to be within 2 Pi
if 0 <= xRadians || xRadians <= Float(M_2_PI) {
cameraOrientation.v0 = xRadians
} else if xRadians > Float(M_2_PI) {
// Set rotation to the excess
cameraOrientation.v0 = xRadians - Float(M_2_PI)
} else {
// Essentially subtracts the negative overflow from the top end rotation (2 Pi)
cameraOrientation.v0 = xRadians + Float(M_2_PI)
}
let yRadians = cameraOrientation.v1 + -yRotation * Float(M_PI) / 180
if 0 <= yRadians || yRadians <= Float(M_2_PI) {
cameraOrientation.v1 = yRadians
} else if yRadians > Float(M_2_PI) {
cameraOrientation.v1 = yRadians - Float(M_2_PI)
} else {
cameraOrientation.v1 = yRadians + Float(M_2_PI)
}
}
func updateViewMatrix(atTime time: CFTimeInterval) {
// ... //
view = Matrix4().rotateAlongXAxis(cameraOrientation.v0).rotateAlongYAxis(cameraOrientation.v1)
➥.translate(x: cameraPosition.v0, y: cameraPosition.v1, z: cameraPosition.v2)
}
Now back in ViewController.swift, override the mouseDragged(_:) method after the keyDown(_:) and keyUp(_:) methods.➥
import Cocoa
class ViewController: NSViewController {
// ... //
override func mouseDragged(theEvent: NSEvent) {
if let view = self.view.subviews[0] as? SwiftOpenGLView {
// Use our new method to set the camera rotation.
view.rotateCamera(pitch: Float(theEvent.deltaY), yaw: Float(theEvent.deltaX))
}
}
}
With that, run the application and move freely through your 3D world.
We now have a working 3D view that supports objects, colors, textures, and movement. Before we start adding more functionality, it's time to make our code a little more Swift. That's right it's time to refactor. Doing everything out such that it is one long list of steps more or less is very useful when one just starting to learn how to work in OpenGL, but the bigger the project gets, the confusing may get as well. Before you move on, make sure you understand how each piece fits into the app itself.
Please leave your comments and questions in the comments below. Help me make these tutorials better! If there is something you don't understand, feel is unclear, or can't get to work, just let me know. I'll do my best to help. Thank you for follow along so far!
The project target for this tutorial is on GitHub: OnTheMove.
When you're ready, click here to start refactoring SwiftOpenGLView.swift.


Myles,
ReplyDeleteThis is a very well done tutorial. I'm a fairly capable Swift/Cocoa programmer who has tried to learn OpenGL a number of times. Each time I've given up frustrated by the (to me) strange api. Your tutorial has gotten me further than anything else. I'm sure I'll go over it a hundred times more and yet still find new information each time.
Thanks for taking the time to do this.
I'm so glad that I've been able to help. I'm sure there is much I could learn from you! Especially with the next few tutorials as we are going to work with some refactoring. We'll be applying a protocol oriented methodology as best we can. If you have any input you find would help, please feel free to share it. I'm working on the tutorials now abd because of the way Swift and OpenGL initialize types in different ways, it makes the process difficult. Hopefully, I'll be able to break it down into reasonable increments before we move on to things like shader and model loading from files.
DeleteIn working through your examples and then creating my own variations I've noticed a strange behavior. If I start with one of your first examples (which I think I've reproduced correctly) and I run it "as-is" it consumes a small amount of memory (as shown in xCode) and that amount is static, i.e. non-increasing.
DeleteIf I add a few lines of code to create an NSTimer that fires every 0.1 second and a func that sets "needsDisplay= true" when the timer fires, everything seems to still work however the memory consumption slowly goes up without any apparent limit.
Something appears to be "leaking". I've tried using Instruments to track this down but haven't succeeded (Instruments isn't my strong point).
Is there something additional needed for the more dynamic operation? I did this as a precursor to trying to actually use dynamic vertex data (glMapBuffer and such) but if I can't make this simple example work, I doubt I'll get the more complex one correct.
Have you put any of your code somewhere (e.g. Git) where I could copy it to be sure I've done everything you intended?
Thanks for your help.
That's a great question. I, too, thought that there may be a memory leak when i was first working with NSTimer and with CVDisplayLink. However, using Instruments you find there are no leaks or zombies appreciated. If you just run the program and watch the memory meter as you were, you'll find that after a time, the amount of memory reaches a limit, and there will be a sudden drop in the memory usage. Essentially, a number of elements are created but not disposed of until the memory held by the app reaches a certain size, then there is a big memory dump. I think this likely part of an optimization, but I am not sure. There are many things that I don't know about Cocoa and it's inner workings, but this seems to make the most sense from what I have experienced.
DeleteTry it. Start the app and just let it sit there, running. Watch the memory meter and you'll find that it will increase slowly until finally it drops to the starting value or something close to it.
I've tried to do a careful evaluation of the memory usage. I'm running the CVDisplayLink version of the code from Part 3.0. What I'm seeing is a sort of sawtooth pattern where memory usage climbs and then falls back after a period of time (a few minutes, its not always the same). Unfortunately, the fallback position is always higher than the value it started at so over time, the memory usage climbs. As an example, Part 3.0 (CVDisplayLink version) starts at 14.4. mb, goes to 19.5 mb in ~ 4 minutes then falls back to 17.6 mb. 17.6 mb grows to 19.7 mb then falls back to 17.8 mb. 17.8 mb grows to 20.3 mb then falls back to 18.3 mb. The fallback value is always higher than the starting value.
DeleteWhen I take the code and apply it to my actual application the results are more startling, my initial 150 mb memory usage grows over a period of two hours to 1.5 GB at which point the program dies.
I think there is a leak but I don't have the skill to find it.
I ran my version of the vote, and it get a memory footprint that ranges from 16.5 - 18.4. It never gets higher than that even running for >10 minutes. I have uploaded the project target's to GitHub. It took me awhile to remember how to do the .gitignore file and so forth. Unfortunately, in the process of setting everything up, I deleted all of the old files I was trying so hard to protect. I haven't backed my computer up with TimeMachine in quite awhile... so everything is lost. Oh well, I was going to redo those projects anyway, I was just hoping to use them as a reference before actually deleting them. Maybe seeing the topic with completely fresh eyes will be good. These files had my file loaders for shader and model files, so yes, I'll be implementing something very much like your "tools" helper class. The reason I haven't introduced them yet is that I wanted readers to be able to see all of the basic parts working in progression. The next step after finishing off the refactoring for MVC involves a helper struct for loading files, for errors, etc. Thank you for all of the typo error your caught, I'll get them all fixed. You're right, they're all transfer artifacts, but not all readers may know that, so thank you very much for pointer them out.
DeleteA few more issues:
ReplyDeletethis line:
// Create a vector, normalize it, and apply the amplitude value
let displacement = Vector3(v0: directionX, v1: directionY, v2: directionZ).normalize()
* amplitude
has the following error:
Binary operator '*' cannot be applied to operands of type 'Vector3' and 'Float'
This line:
// For strafing, calculate the vector perpendicular to the current forward and up
// vectors by rotating the normalized X vector (1.0, 0.0, 0.0) according to current
// orientation, then re-normalize before applying the amplitude value
let rightVector = Matrix4().rotateAlongXAxis(cameraOrientation.v0)
.rotateAlongYAxis(cameraOrientation.v1).inverse() *
Vector3(v0: 1.0, v1: 0.0, v2: 0.0)
has the following error:
Value of type 'Matrix4' has no member 'inverse'
My guess is that you changed the code at some point but didn't go back and edit Vector3 and Matrix4. Looking at Vector3 and Matrix4 they don't include the referenced operation/method.
Doug
Myles,
ReplyDeleteThanks for the updates. Here's one more that's needed:
let xDegrees = cameraOrientation.v0 + -xRotation * Float(M_PI) / 180
should be (I think):
let xRadians = cameraOrientation.v0 + -xRotation * Float(M_PI) / 180
With this change this one seems to be working.
I've written a "helper" class for reading, compiling and linking shaders. The only line in my version of your code for all of that is:
// create a ProgramID, Compile & Link the Shaders
if !tools.loadShaders(&shaders) {
// FIXME: do something if there is an error
NSLog("\(shaders[0].error!)")
}
I'd be happy to share it with you. What's the best way to do that?
Doug
Yes, the GitHub repository is correct. xDegrees, should be xRadians. Yes, you may certainly share that if you like. The best way might be GitHub. I have a file loader that I am going to be adding to these tutorials very soon, but before that though, we'll be doing some refactoring to make the project more MVC compliant. That hardest part about this is deciding what is really considered view code that needs to stay in the implementation of SwiftOpenGLView, and what code is better moved to the model portion of the paradigm. For instance, I am still toying with the idea of weather or not glDraw* commands are really View code or perhaps better considered Model code. After, these calls don't in and of themselves do anything to the view. It is the CGLFLushDrawable() call that takes the back buffer we "drew" our current render into makes it the context from which the View pulls it's drawing information. glDraw* commands merely calculate data that fills a context, and a context is merely a collection of data that contains a bitmap and various parameters for interpretation of the said bitmap. The information of a context may be used as a view's source material, but it may also be used to calculate more data, or create something like a PDF. So a context and the methods that lead to it's editing don't necessarily belong in the view's code. This is especially true if we we're to acquire a context from a source other than a view.
DeleteAt any rate, the more I think about it, the more I am inclined to implement drawing code similar to that which Apple demoed at WWDC '15 "Protocol Oriented Programming". In the playground, various polygons have code to draw themselves with a provided renderer (a CGContext). Anyway, i think that's where I'm headed for my MVC conformance. After that, I'll talk about evaluating and parsing strings.
I think I found the Stack Overflow discussion where you explained your Swift-based approach to CVDisplayLink. In that discussion there is a variation on your idea from "nielsbot". I tried using his approach to see if it would impact the memory leak I've seen, it didn't change anything.
ReplyDeleteIn looking at it I remembered the advice I'd seen in many other places "always do UI on the main thread". The CVDisplayLInk runs on its own thread. I tried putting self.drawView() inside the callback. Within the callback I used dispatch_async(get_main_queue(){} to guarantee the drawView() was called on the main thread. Now my code behaves the way you described. The memory consumption goes up a few mb and then falls back. The pattern repeats and the highest consumption never gets higher no matter how long the code runs.
My guess is that your original code would work the same way. i.e. if I called drawView() on the main thread. I'll give it a try. I can't explain why your results are different than mine??? I have noticed that running the same code on two different Macs produces somewhat different results (Mac Pro and a Mac Mini). I'm guessing that different graphics hardware is the reason.
Yes, I have two answers on that Stack Overflow discussion regarding CVDisplayLink (one for a Swift/Obj-C mix and one for pure Swift). The code in those answers is unchanged from the code I have used in these tutorials with the exception that renderView() was changed to drawView(). It is true that CVDisplayLink runs on a separate thread, but this is why we use CGLLockContext() and CGLUnlockContext(). The only reason that we need to do this is so that a particular set of data is not accessed and/or modified by another thread at the same time. Being on separate threads would not increase the memory footprint of one's app. I didn't not need to use a dispatch call, and no, you do not need to run drawView calls on the main thread. That's the whole point of using CVDisplayLInk--use a separate thread to render a scene so the main thread can work out other calculations or prepare for the next scene. When working in a multithreaded environment, we're just concerned about having "too many hands in the pot" or "cooks in the kitchen". Pardon the colloquial phrases, but the point being that the increased memory footprint you are experiencing is more likely related to an error in your code. I don't know why adding in dispatch calls solved the problem, but the code should work without those calls. I can't stress that enough for future readers. The projects I have placed on GitHub, have the sawtooth pattern you described without using any dispatch code. The draw calls are called by an alternate thread. Remember that rendering an image is not strictly UI related as this code may be useful for not UI related operations. It is sending the context in which the render is placed to the View for display to the user that is UI related. The ViewController which is managing user related events from the SwiftOpenGLView is on the main thread. It gets a render to display from a separate thread and displays it once it's ready. In regard to getting different results from Mac to Mac, that shouldn't be so obvious with the simple calls we have been making thus far, but with more complicated code, it is possible to get slightly different results from graphics card to graphics card.
DeleteThat all makes sense, I can't explain my results. I'll go back and recheck all of my code.
DeleteWhere is your GitHub? I logged into GitHub and did a search for your name but couldn't find the repo. Once I find it I'll run your code to see if it produces the desired result.
I have attached a link to the associated files on GitHub. The repository is called SwiftOpenGLTutorials. Let me know how it goes for you.
DeleteThese erros have been corrected. I'm not sure how I missed the inverse() method. That's really important for part two. It is already part of the GitHub project files, so I know the project complies and works correctly. It just got lost in transfer to the blog post.
ReplyDelete