2.2: Adding Some Texture
This time we are adding a texture to the triangle. We'll have to add two main pieces of data: texture coordinates and texture data. Texture coordinates are the same as vertex positions in that they may be described in 4 dimensions. When we talk about a position (coordinate) on the texture itself, the vectors are named s, t, r, and q. An alternative naming convention is to use u, v, w in place of s, t, and r. I believe the fourth vector is sometimes called x instead of q, (but don't quote me on that). Also, to complicate the naming convention further, GLSL does not use r, but p for the third vector because r is already taken by red in rgba. All that to say that GLSL texture coordinates are named s, t, p, and q, but OpenGL names them s, t, r, and q. Yes, yet another OpenGL inconsistency that can get a little confusing if you don't know about it.
Adding a texture is going to take several steps--far more non-trivial than adding color. First, create a new target called TextureTriangle (make it duplicate of ColorTriangle). Then, we will add a two dimensional texture position--s and t values--to the end of each vertex.
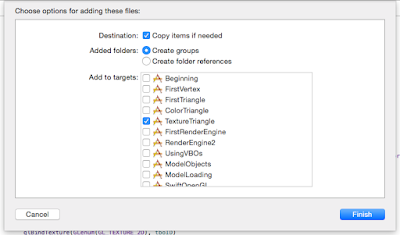
Then we'll work on getting a texture into our app. You can use any texture you want, but for the purpose of this tutorial we'll use the Blender checker board. From your web browser, search "blender checker texture 256". It should be the third image you see. Save this image as "Texture.png", then draw it into the TextureTriangle folder in the Project Navigator. A drop down menu appears for adding the file to the project. Make sure Copy items if needed, Create groups, and TextureTriangle are selected.
Click Finish and your file will be added to the project. It would be a lot more organized to use the Images.xcassets folder, but that's in a different group folder. We'll add it to the current target folder instead to avoid confusion for now. We'll access this file through NSBundle: a location from which you can access path's to data. We'll then create a CGImage with Texture.png. Core Graphics can then use this to create a bitmap context: a stream of binary data comprised of the individual pixel rgba values.
This bitmap is just like the array of vertices we created earlier and can be sent to OpenGL to fill an OpenGL object. This time we are filling a texture buffer object (TBO). TBO's are generated and bound just like any other object, but the big difference is that it requires some additional information about how to treat the data. It's almost like a mixture of a VBO and VAO. It also has to be deleted like any other OpenGL object in the deinit.
Finally, we need to add another vertex attribute pointer to the VAO, and we need to add the attributes to the shaders. We'll also need to add our first uniform. These are attributes that are the same across every run of the shader. For textures, the uniform is called a sampler (sampler2D in this case because we are using a 2D image). Unfortunately, we can't use layout (location = x) for sampler2D. We'll have to use glGetUniformLocation( ) instead. Remember that you cannot use these get location functions until after the shader is finished.
Let's look at the code to get a better understanding of how we add textures.➥
// Pass in the location and the predefined variable that states which texture slot
// we are filling--there are a total of 30 slots available.
Run the app and take a look at the colored, textured triangle.

If you just want to see the texture, then set the outColor of the fragment shader to texture(sampler, passTexturePosition).

Not bad, not bad at all. I suggest playing with the texture position value that you pass in for each vertex so you get a feel for what is going on here. Essentially, the entire texture is mapped from 256x256 to 0.0 - 1.0x 0.0 - 1.0. Thus 0.0, 0.0 is the top left of the image while, 1.0, 1.0 is the bottom right. This makes the origin at the top left of the image like on iOS. OS X on the other hand uses the bottom left as the origin. I added some text to the texture to clarify which corners we're looking at.

If we invert the t values of our texture position for each vertex, the image will flip right side up.

Now we can see that the Bottom of the image really is the bottom of our triangle. You can play around with the texture parameters if you like and see what changes when you alter the settings. We'll get more into that later, but for now, I think it is enough just to understand how to get a texture on the screen. Lots of rendering techniques use textures as their foundational method of image creation. It's really important to understand the basics of just getting an image on screen.
Please remember to leave your comments below and help me make these tutorials better!
When you're ready, let's add some light to the seen!
You can find the project target, TextureTriangle, on GitHub.
Adding a texture is going to take several steps--far more non-trivial than adding color. First, create a new target called TextureTriangle (make it duplicate of ColorTriangle). Then, we will add a two dimensional texture position--s and t values--to the end of each vertex.
Then we'll work on getting a texture into our app. You can use any texture you want, but for the purpose of this tutorial we'll use the Blender checker board. From your web browser, search "blender checker texture 256". It should be the third image you see. Save this image as "Texture.png", then draw it into the TextureTriangle folder in the Project Navigator. A drop down menu appears for adding the file to the project. Make sure Copy items if needed, Create groups, and TextureTriangle are selected.

Click Finish and your file will be added to the project. It would be a lot more organized to use the Images.xcassets folder, but that's in a different group folder. We'll add it to the current target folder instead to avoid confusion for now. We'll access this file through NSBundle: a location from which you can access path's to data. We'll then create a CGImage with Texture.png. Core Graphics can then use this to create a bitmap context: a stream of binary data comprised of the individual pixel rgba values.
This bitmap is just like the array of vertices we created earlier and can be sent to OpenGL to fill an OpenGL object. This time we are filling a texture buffer object (TBO). TBO's are generated and bound just like any other object, but the big difference is that it requires some additional information about how to treat the data. It's almost like a mixture of a VBO and VAO. It also has to be deleted like any other OpenGL object in the deinit.
Finally, we need to add another vertex attribute pointer to the VAO, and we need to add the attributes to the shaders. We'll also need to add our first uniform. These are attributes that are the same across every run of the shader. For textures, the uniform is called a sampler (sampler2D in this case because we are using a 2D image). Unfortunately, we can't use layout (location = x) for sampler2D. We'll have to use glGetUniformLocation( ) instead. Remember that you cannot use these get location functions until after the shader is finished.
Let's look at the code to get a better understanding of how we add textures.➥
final class SwiftOpenGLView: NSOpenGLView {
private var programID: GLuint = 0
private var vaoID: GLuint = 0
private var vboID: GLuint = 0
private var tboID: GLuint = 0 // The texture buffer object
// //// //
// init //
// //// //
override func prepareOpenGL() {
super.prepareOpenGL()
glClearColor(0.0, 0.0, 0.0, 1.0)
programID = glCreateProgram()
// This time we'll add texture coordinates to each vertex. When appliced to a model,
// These coordinates are named U and V. When these same coordinates are applied to a
// texture, they are named S and T. I am not really sure why a separate naming
// convention is used, but it is. either way, they values are clamped between 0.0-1.0
// As a side, texture coordinates may be described in four dimensions like position
// and color: s, t, r, and q. However, in GLSL, r is already used for red, so it is
// replaced by p. Thus, in GLSL only, texture coordinates are defined as s, t, p, and q
// We only need two dimensions for our texture--we'll add s and t coordinates to each
// vertex after each color.
let data: [GLfloat] = [-1.0, -1.0, 1.0, 0.0, 0.0, 0.0, 0.0,
0.0, 1.0, 0.0, 1.0, 0.0, 0.5, 1.0,
1.0, -1.0, 0.0, 0.0, 1.0, 1.0, 0.0]
// Now we'll take the time to create the texture data. We're using the Core Graphics
// Framework which allows us to generate and load images that can be placed into bitmaps
// Get the URL for the texture we added to the TextureTriangle file.
// The NSBundle is used to access files packaged with the app, URL's are preferred
// over paths
let fileURL = NSBundle.mainBundle().URLForResource("Texture", withExtension: "png")
// To get the file's contents into the CGImage, we need a data provider
// The dataProvider is what actually writes the data into the the CGImage from the file
// The second parameter of our CGImageCreate function is for a decode
let dataProvider = CGDataProviderCreateWithURL(fileURL)
let image = CGImageCreateWithPNGDataProvider(dataProvider, nil, false,
➥.RenderingIntentDefault)
// Declare a pointer to a collection of memory that will hold the texture data.
// If you don't use this step, you cannot access the data when you need it
// The space in memory must be allocated before we send it into our context
// we use malloc to reserve a space of memory 256 * 4 bytes wide (4 bytes, 8 bits
// each for r, g, b, and a for 256 pixels), and a height of 256
let textureData = UnsafeMutablePointer<Void>(malloc(256 * 4 * 256))
// create a context and pass in the textureData UnsafeMutablePointer as the storage
// location for the image data
let context = CGBitmapContextCreate(textureData, 256, 256, 8, 4 * 256,
➥CGColorSpaceCreateWithName(kCGColorSpaceGenericRGB),
➥CGImageAlphaInfo.PremultipliedLast.rawValue)
// Draw the image into the context, this transfers the CGImage data into the
// CGContext
CGContextDrawImage(context, CGRectMake(0.0, 0.0, 256.0, 256.0), image)
// Generate and bind a texture buffer object
glGenTextures(1, &tboID)
glBindTexture(GLenum(GL_TEXTURE_2D), tboID)
// Set up the parameters regarding how the bounds of the texture are handled
// The min and mag filters tell OpenGL how to handle choosing pixels when the
// the image is made bigger or smaller than it's actual size, we'll just set it
// to linear interplation for now.
// The wrap s and t paramters tell OpenGL what do do when the texture position
// is outside the range of the texture. clamp to edge just continues the color.
// Note that only the min and mag parameters are required, the wrapping parameters
// are not.
glTexParameteri(GLenum(GL_TEXTURE_2D), GLenum(GL_TEXTURE_MIN_FILTER), GL_LINEAR)
glTexParameteri(GLenum(GL_TEXTURE_2D), GLenum(GL_TEXTURE_MAG_FILTER), GL_LINEAR)
glTexParameteri(GLenum(GL_TEXTURE_2D), GLenum(GL_TEXTURE_WRAP_S), GL_CLAMP_TO_EDGE)
glTexParameteri(GLenum(GL_TEXTURE_2D), GLenum(GL_TEXTURE_WRAP_T), GL_CLAMP_TO_EDGE)
// Transfer the bitmap image data to the TBO
// The target is the type of texture, we are using a 2D texture
// The mipmap level is not turned on if you choose 0
// The format we want the texture to be is rgba (GL_RGBA)
// The number of pixels along the width
// The number of pixel along the height
// The number of pixels desired as a border around the texture (we want 0)
// The format of the incoming bitamp data is also rgb (GL_RGBA)
// The type of data coming in is in bytes which are > 0, so unsigned
// (GL_UNSIGNED_BYTE)
// A pointer to the data itself
glTexImage2D(GLenum(GL_TEXTURE_2D), 0, GL_RGBA, 256, 256, 0, GLenum(GL_RGBA),
➥GLenum(GL_UNSIGNED_BYTE), textureData)
// Free up the textureData space we reserved from earlier.
free(textureData)
glGenBuffers(1, &vboID)
glBindBuffer(GLenum(GL_ARRAY_BUFFER), vboID)
glBufferData(GLenum(GL_ARRAY_BUFFER), data.count * sizeof(GLfloat), data,
➥GLenum(GL_STATIC_DRAW))
glGenVertexArrays(1, &vaoID)
glBindVertexArray(vaoID)
// The first pointer is to the position data -- note the last two arguments: stride
// and offset.
// Stride - number of bytes from the start of one vertex to the start of the next
// In other words, each vertex is made of 5 elements from the array (x, y, r, g,
// and b). Each element is a GLfloat with is 4 bytes of data; therefore,
// 5(4) = 20 bytes
// Offset - number of bytes from the vertex's start address that must be passed by
// before reaching the appropriate data
// The position data starts at the start address; therefore, offset = 0
// The color data starts 2 floats (2(4) = 8 bytes) from the vertex address;
// therefore, offset = 8
glVertexAttribPointer(0, 2, GLenum(GL_FLOAT), GLboolean(GL_FALSE), 28,
➥UnsafePointer<GLuint>(bitPattern: 0))
glEnableVertexAttribArray(0)
// The second pointer is to the color data.
glVertexAttribPointer(1, 3, GLenum(GL_FLOAT), GLboolean(GL_FALSE), 28,
➥UnsafePointer<GLuint>(bitPattern: 8))
glEnableVertexAttribArray(1)
// The third pointer is to the texture data
glVertexAttribPointer(2, 2, GLenum(GL_FLOAT), GLboolean(GL_FALSE), 28,
➥UnsafePointer<GLuint>(bitPattern: 20))
glEnableVertexAttribArray(2)
// Unbind the VAO so no further changes are made.
glBindVertexArray(0)
// Add a texture coordinate in and out attribute to pass the coordinates to the
// fragment shader--make sure the set the out att. to the in att. value in main()
// We'll use location 2 for texture coordinates
let vs = glCreateShader(GLenum(GL_VERTEX_SHADER))
var source = "#version 330 core \n" +
"layout (location = 0) in vec2 position; \n" +
"layout (location = 1) in vec3 color; \n" +
"layout (location = 2) in vec2 texturePosition; \n" +
"out vec3 passColor; \n" +
"out vec2 passTexturePosition; \n" +
"void main() \n" +
"{ \n" +
" gl_Position = vec4(position, 0.0, 1.0); \n" +
" passColor = color; \n" +
" passTexturePosition = texturePosition; \n" +
"} \n"
// ///////////////////////////// //
// Vertex shader compile success //
// ///////////////////////////// //
// It is really important to name the in attribute the same as the out attribute from
// the vertex shader--otherwise the connection won't be between them. The name of the
// out attribute does not matter. You just have to have an out and it has to be a
// vec4: we have to account for the alpha component of a color. We can use the same
// syntax for creating the vec4 color as we did the position in the vertex shader
// (i.e. passing passColor for the frist three vertices and 1.0 for the fourth to make
// a complete vec4
// The uniform sampler2D is how the texture data gets into the shader. It's a uniform
// because it is the same data every time the fragment is run, whereas the in attributes
// change every time the fragment is run.
// The outColor attribute uses a combination of the texture and color to produce an
// output. The color part we have already seen. The texture() function has two
// arguments: the texture to be used, and the position on the texture.
let fs = glCreateShader(GLenum(GL_FRAGMENT_SHADER))
source = "#version 330 core \n" +
"uniform sampler2D sample; \n" +
"in vec3 passColor; \n" +
"in vec2 passTexturePosition; \n" +
"out vec4 outColor; \n" +
"void main() \n" +
"{ \n" +
" outColor = vec4(passColor, 1.0) * texture(sample, passTexturePosition); \n" +
"} \n"
// /////////////////////////////// //
// Fragment shader compile success //
// /////////////////////////////// //
// ////////////////////////////// //
// Program attachment and linking //
// ////////////////////////////// //
// Set the Texture Uniform with glGetUniformLocation
// take care to type in "sample" properly otherwise you'll get an error// Pass in the location and the predefined variable that states which texture slot
// we are filling--there are a total of 30 slots available.
let sampleLocation = glGetUniformLocation(programID, "sample")
glUniform1i(sampleLocation, GL_TEXTURE0)
drawView()
}
// ///////////////////////// //
// drawRect() and drawView() //
// ///////////////////////// //
deinit {
glDeleteVertexArrays(1, &vaoID)
glDeleteBuffers(1, &vboID)
glDeleteProgram(programID)
glDeleteTextures(1, &tboID) // Delete the TBO
}
}
Run the app and take a look at the colored, textured triangle.

If you just want to see the texture, then set the outColor of the fragment shader to texture(sampler, passTexturePosition).

Not bad, not bad at all. I suggest playing with the texture position value that you pass in for each vertex so you get a feel for what is going on here. Essentially, the entire texture is mapped from 256x256 to 0.0 - 1.0x 0.0 - 1.0. Thus 0.0, 0.0 is the top left of the image while, 1.0, 1.0 is the bottom right. This makes the origin at the top left of the image like on iOS. OS X on the other hand uses the bottom left as the origin. I added some text to the texture to clarify which corners we're looking at.

If we invert the t values of our texture position for each vertex, the image will flip right side up.
let data: [GLfloat] = [-1.0, -1.0, 1.0, 0.0, 0.0, 0.0, 1.0,
0.0, 1.0, 0.0, 1.0, 0.0, 0.5, 0.0,
1.0, -1.0, 0.0, 0.0, 1.0, 1.0, 1.0]

Now we can see that the Bottom of the image really is the bottom of our triangle. You can play around with the texture parameters if you like and see what changes when you alter the settings. We'll get more into that later, but for now, I think it is enough just to understand how to get a texture on the screen. Lots of rendering techniques use textures as their foundational method of image creation. It's really important to understand the basics of just getting an image on screen.
Please remember to leave your comments below and help me make these tutorials better!
When you're ready, let's add some light to the seen!
You can find the project target, TextureTriangle, on GitHub.


Comments
Post a Comment